Monday, October 14, 2013

Roasted Strawberry-Buttermilk Sherbet

I knew it'd been a long, long time since I posted... but I didn't realize it'd been 6 months. Yikes! So let's get right into it.

One of my favorite kitchen gadgets is definitely my ice cream maker, and usually I'm making this recipe. But for some reason I never really branched out from that recipe because I always assumed that making homemade ice cream was a time consuming process. I didn't want to deal with cooking the eggs and cream, making sure it's tempered, etc. etc. Ain't nobody got time for that.

So I was really excited when I saw this recipe for Roasted Strawberry-Buttermilk Sherbet in Bon Appetit a few months back. It looked so quick and easy (and delicious)! I've since made it twice, and I have to say that it's now one of my favorite frozen treats. Not to mention that the smell of the strawberries and vanilla bean roasting together in the oven was the MOST heavenly smell to ever come out of my kitchen. Seriously! Someone should turn that into a candle scent.

Roasted Strawberry-Buttermilk Sherbet

Ingredients:

  • 4 cups strawberries (about 1lb), hulled, halved or quartered if large
  • 1 cup sugar
  • 1/2 vanilla bean, split length wise
  • 1 1/2 cups buttermilk
  • 1/3 cup sour cream
  • pinch of kosher salt
(Note: I used a full vanilla bean, as I LOVE the taste of vanilla. I recommend doing this)


Directions:

  • Preheat oven to 425°. Combine strawberries and sugar in a 13x9x2 inches baking pan. Scrape in seeds from vanilla bean and add pod; toss to combine. Roast berries, stirring occasionally, until juices are bubbling, 15–20 minutes. Let cool.


  • Discard pod. Purée berries, buttermilk, sour cream, and salt in a blender until smooth. Process mixture in an ice cream maker according to manufacturer's instructions. Transfer sherbet to an airtight container and freeze until ready to serve.


  • DO AHEAD: Sherbet can be made 1 week ahead. Keep frozen. Let soften at room temperature 15 minutes before serving.

Monday, April 15, 2013

Favorite Beauty Products

Hi there! I'm apparently back to my old ways of posting once a month, whoops! In my defense I was recently in Paris, as well as Houston and Miami a few weeks back.

Anywho - something I've been meaning to write about recently is my list of favorite beauty products right now. As most of you know, I recently started working at Birchbox (check it out here) and since then I feel as though my love of beauty products has skyrocketed! Below are my tried and true, go-to products that I really can't live without.

Benefit they're Real! Mascara

I used to be devoted to L'oreal Voluminous mascara.. until I tried this one. One of my biggest complaints about every single mascara I had tried previously was the smudging and flaking. I would get so frustrated at the small, black mascara pieces that would fall on my cheeks and under eyes throughout the day!

This one not only stays put no matter what, but it makes your lashes look AMAZING. Seriously, this is the best mascara in the entire world. No doubt.

Buy it here.


NARS Orgasm Blush and Illuminator

 
I've been wearing NARS Orgasm blush since college, and then recently I tried the Illuminator and was hooked! Both work really great with any skin tone (I'm super, super fair) and give the perfect peachy-pink glow. 

Buy them here (blush) 
and here (Illuminator)


All things Oscar Blandi: Hair Lift Mousse, Dry Shampoo, Texture & Volume Spray


I was a fan of Oscar Blandi's dry shampoo way before I started working at Birchbox, but now the texture spray and lifting mousse are necessary items in my styling routine as well!

I have very fine, limp hair (thanks mom and dad). So everyday I put the mousse in my hair while it's damp, and then after blow drying I spray my roots with the texture and volume spray for more lift. It makes all of the difference!

Buy them all here.
AHAVA Dermud Hand Cream


I was actually given this hand cream as a gift last winter, and I've been addicted to it every since. If you're anything like me, your hands take a serious beating in the colder months. They're super dry, itchy, flaky and can even crack and bleed in the uber cold months (ouch). 

This hand cream is the ultimate salvation and the only thing I've found that actually prevents dry hands, as well as treating it. I don't just use mine in the winter though - it sits next to our bed and gets used constantly year round!

Buy it here.


OPI Nail Lacquer: Skull and Glossbones


This light grey shade by OPI is actually part of the Pirates of the Caribbean collection, and it's possibly my all time favorite nail color. It's a very light grey mixed with a tiny bit of taupe and is the perfect neutral for all seasons.

I end up doing my own nails 90% of the time (although they usually need full manicures, but that's just too darn expensive on a regular basis), so this is one that's often on my fingers. I often receive numerous compliments every time I wear it!

Buy it here.


Cetaphil Daily Facial Moisturizer with SPF 15

A few years back I was having some issues with acne, and it seemed like every specialty moisturizer, cream, cleanser, etc. was irritating my skin. My dermatologist suggested that I keep it simple when it comes to my cleanser and moisturizer, so I switched over to this one by Cetaphil as she recommended. 

It turned out that my derm was right: my skin cleared up shortly after I stopped irritating it so much, and this moisturizer became a part of my daily routine. It's very lightweight and I love that it's already got a little SPF in it (although I wear much more if I'm going to be in the sun for long). 

Buy it here.


So these are some of my top choices when it comes to beauty and they will all stay in my regimen for as long as they're on the shelves.

Also: the more I write this post the more I realize I have so many more great products I'd love to share. I think breaking it down by type would be best- so be on the look out for more posts with amazing beauty products in the future!

Are there any beauty products that you'd love a recommendation on? If so, let me know in the comments below. Happy beautifying! 

Sunday, March 10, 2013

Going Gluten Free

This post makes me kind of sad.. mainly because after tonight I will be going on a gluten free diet.

Sigh.

Long story short, I've had stomach pains and problems for about as long as I can remember, and last year I decided to do something about it. Thankfully the results came back that I don't have Chron's or celiac disease, but my doctor mentioned that adopting a gluten free diet would be a good idea. Except I never actually heeded that advice, until now - after I've finally had enough of dealing with the symptoms!

This is going to be tough though, since so many of my favorite things have gluten in them (beer! pasta!), but it will be worth it. Also, since I know for a fact that I don't have celiac's (probably just a gluten intolerance I was told), then I know that if I really, really want that Corona - I can have it. We're also getting ready to go to Paris, and I'm sure a croissant and some baguette will be in order at least once.

But for the sake of my health and confidence I will be maintaining a gluten free diet the majority of the time. I've also decided to give up pork products - for really no other reason than they make me feel sick and I've lost the taste for them. I don't think I'd say no to the occasional piece of ham - but all other pork products I'm happy to say goodbye to.


For anyone who currently eats gluten free, do you have any recommendations? I'm feeling slightly overwhelmed at this point at the number of things that are now no longer an option, so any tips and tricks (and recipes!) are more than welcome.

Here's hoping this finally fixes all of the frustrating problems I've been experiencing for years, and years, and years...

Monday, February 11, 2013

Favorite Things From This Week

Oh Sunday nights, how I loathe thee... I had planned to write about our San Juan trip today (a photo heavy post), but the day has slipped by. So instead, how about a few of my "favorite things" from this past week:

1. This Superbowl commercial that I'm watching on repeat.


Over the last couple of years I've actually been pretty disappointed in the Superbowl commercials, but this year was a little better. This Doritos commercial was by far my favorite of the bunch, and in my opinion the best part is the goat "scream" towards the end.. it cracks me up every time!

2. This mascara.


I've never posted about beauty products before, but I'm seriously obsessed with this mascara from Benefit. It may be quite a bit more expensive than my usual drugstore choice (which is L'oreal's Voluminous - I highly recommend that as well), but it is worth every penny. Zero clumping, zero smudging, and amazing looking lashes means that I am a convert 100%. Buy it here.

3. Blizzard drinks.


While this over-hyped blizzard was taking place, Vlady and I were enjoying a casual dinner at our favorite diner, Good Stuff. It's actually become somewhat of a tradition for us to go here during "big" events: we came here before hurricane Irene struck, as it was the only place open. We also happened to be in the diner the day that Whitney Houston died, and we came here after we voted in 2012 to watch the election coverage. So it seemed fitting to be here during the blizzard as well - and I celebrated by sipping a drink that made me want to be on a beach.

4. And of course, what favorite things post would be complete without a picture of my all-time favorite:


(picture stolen from my sister)

Monday, January 28, 2013

Outfit Post (Plus My Favorite Jewelry Designer)

Hi guys! I received pretty good feedback from the last outfit post, so I figured I'd put up another one from recently. I wore the below to work one day a couple of weeks back - back before it got to be so freezing!

Seriously, this weather is insane. I've been wearing nothing but pants and layers upon layers for the past week... but back before it felt like it was -1 outside (not kidding) I was able to wear stuff like skirts and tights.

Is it spring yet??


Sweater: Limited (similar)
Skirt: H&M (similar in coral, similar)
Necklace: Amrita Singh 
Tights: DKNY
Shoes: Qupid (practically identical - and on sale!)


Also - I wanted to mention the designer of the necklace I am wearing here. Her name is Amrita Singh and she's an Indian designer who makes the most beautiful, colorful pieces! I've been buying her jewelry on Rue La La for a couple of years whenever it pops up, and I am in love with everything she does! Take a look at some of the other gorgeous pieces below - these are the epitome of statement necklaces. A link to her site is here, but her stuff isn't exactly cheap - which is why I recommend waiting for it to come up on discount sites like Rue La La and Gilt Groupe (although she's having an amazing sale on the site right now!).


Sunday, January 13, 2013

I Actually Made Something From Pinterest!

I am sure there are many folks out there who can relate to the following statement: I LOVE PINTEREST.  I have spent many an hour pinning pictures of recipes, outfits and general pretty things, but I've never actually done anything with the pins. 

Until today! I came across a recipe a while back for raw cookie dough bites, and after following the link to the recipe I decided to give them a try. These scrumptious little bites of heaven were super simple and quick to make (they literally took me 5 minutes). Plus - they're much healthier than regular cookies, so there's almost zero guilt! Even Vlady raved about how yummy they are, and he's not a huge sweets fan. 

I will definitely be making these over and over, and it's made me want to give so many more of the Pinterest recipes a try!

Raw Cookie Dough Bites

Yield: 12-16 bites (depending on how big you roll them)

Ingredients:
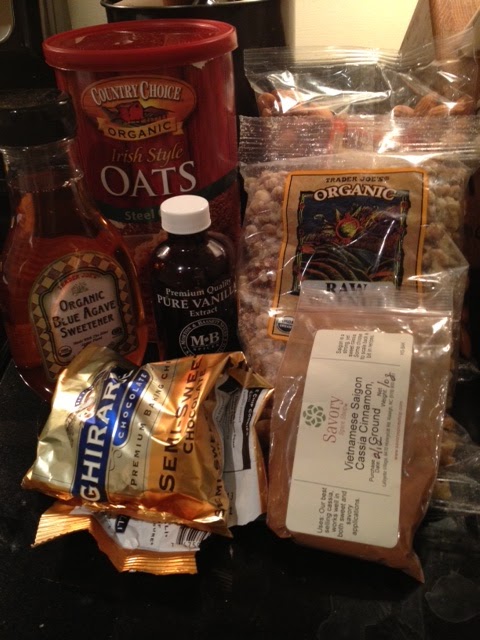
2/3 cup raw almonds
2/3 cup raw walnuts
2/3 cup raw oat flakes
1/4 tsp ground cinnamon
1/8 tsp salt
1/4 cup raw agave nectar
2 tsp pure vanilla
3 tbsp cacao nibs or dark chocolate nibs

Directions:
1. In a food processor, process the almonds, walnuts, oats, cinnamon and salt to a fine meal.
2. Add the agave nectar and vanilla and process to combine.
3. Next, add the cacao nibs or chocolate chips and pulse just to combine.
4. Roll the cookie dough into balls about 1 tbsp each (wet your hands if the dough is too sticky) and place them on a cookie pan lined with parchment paper. Place the pan in the freezer for about an hour to firm up. Store the balls in a tightly covered container in the fridge.

Notes from me:
- This recipe was made for people who only eat raw food, which I do not, so I purchased regular agave nectar.
- Honey could be substituted for agave nectar, but I think the agave gives a slightly caramel flavor that really made the bites taste like cookie dough. 

Ingredients


The finished product in the food processor. 
Yummm!!!!

One more thing: that cinnamon is the best I have ever tried (Vietnamese Saigon cinnamon), and I highly recommend the company that sells it. Savory Spice Shop has stores all over the country (including in Raleigh) but they also have an online store that I regularly order many of my spices and seasonings from. They even send sample seasonings with every purchase! Check them out - you will not be disappointed.

Monday, January 7, 2013

Outfit Post

I wouldn't normally do an outfit post, but I received a lot of compliments on my outfit today.. so I thought "why not share!". I snapped a quick picture when I got home with my phone, hence the not so great quality and darkness. I'd still love to get a nice camera one of these days.. But until then, what do y'all think?


Blazer: Similar
Tank top: Similar
Pants: Loft (on major sale right now)
Boots: Similar
Necklace: IMaccessories (on sale!)
Watch: Fossil (Christmas gift!)


Sunday, January 6, 2013

That time I accidentally stole something

I have a confession to make: a couple of years back I stole a necklace. Thing is though, it was a complete accident!

I got to thinking about the whole incident today when I was going through jewelry to get rid of and was deciding whether or not to keep the necklace. The finish on the necklace was very tarnished, so I'm going to get rid of it, but how I acquired it was quite interesting.

Back when I lived in Raleigh I had gone in to a major chain store to buy a charm necklace for a coworker of mine for Christmas, after she had commented how much she liked one I was wearing. Inside the store the necklaces were displayed on the branches of a small, fake tree and the actual packaging was displayed below the tree. After not having found the necklace I was looking for already pre-packaged, I decided to grab one off the tree and put it in one of the empty packages beneath (there were lots). I was careful to open up the package to make sure it was empty, and it sure looked that way.

So I checked out of the store, went home and began to wrap the necklace. I decided I actually did not want to wrap the necklace in the stores packaging, and when I went to take it out I was shocked to find there were actually two necklaces in there! The original one was pushed behind some tape in a way that I couldn't see it just by looking in, but sure enough it was there... and I had stolen it.

Maybe taking it back to the store would have been the right thing.. but I thought of it more as a "buy one get one free" kind of deal.. right?

No?

Oh well. Now it will be heading on it's way to Goodwill (it's not in bad shape per se, it's just got more of a bronzed look than it used to.. not my favorite), and in case anyone is wondering, below is a picture of said stolen necklace:


The good news is that I've never stolen anything before that, or since! At least not that I know of...

Saturday, January 5, 2013

Best EVER Buffalo Chicken Dip

Hi guys! Long time no see!

I feel like all of my blogs now begin with "I've been busy and haven't blogged in two months..", so one of my new years resolutions is to post WAY more often. Other resolutions involve going to the gym often (of course), and cooking more. Ever since we moved to NYC I've slowly been cooking less, and less and less.. It was getting to the point where we were ordering in almost every night. Yikes! That probably has a lot to do with the extra pounds that have creeped on.

But I don't only want to cook more so that I can be healthy, I also want to cook more because I LOVE it. I've already cooked twice this week, so I'm off to a good start (one of those recipes to come).

So I figured why not go ahead and share one of my favorite low-fat recipes EVER. I make this dip for almost every party because it is always a favorite amongst our friends, and I know people will devour it. I originally took the recipe from my brother in-law, so I have to give him the credit for first getting me hooked on this. Enjoy!!

Buffalo Chicken Dip

Ingredients:
1 lb boneless, skinless chicken breast
1 cup low-fat ranch dressing
1 cup Franks Original hot sauce
1 8oz block (1/3 less fat) cream cheese
1 package shredded sharp cheddar cheese

Directions:
Boil chicken breasts on medium heat for 30-45 minutes, or until cooked through. Preheat oven to 350 degrees.

While chicken is boiling, cut cold cream cheese into cubes and place into an 11"x8" baking dish that is lightly sprayed with Pam. Evenly sprinkle cheese on top of cubes.

Pour ranch and hot sauce on mixture and place in the oven, uncovered, for 7-10 minutes. Stir mixture and put back in the oven for another 7-10 minutes and stir until mixed well.

Shred chicken and mix into cheese mixture. Cover with foil and bake an additional 20-30 minutes.

*A note on shredding chicken: I prefer to shred the breasts using 2 forks, but I've read that throwing it in a mixer is much, much quicker. Perhaps I'll try that one of these days.

All of the ingredients.
Cream cheese in the greased pan.

With the cheese added.

Topped with the ranch and hot sauce (plus a few extra dabs of Franks - I love that stuff!).


Tuesday, November 20, 2012

Lately and More Apartment Pictures

Welp - it's been quite a while since my last post.. 2 months to be exact! Yikes!

What can I say, things have been busy and there were a few unexpected circumstances (just that hurricane that came through). October was a very busy month at work, and just as things began to slow a little we got struck by Sandy. Thankfully we were only without power for about 4.5 days, because I know many others that have been without power for over 4 weeks! Although we got through pretty well during the storm we have had issues with our Internet ever since, so that's made posting a little difficult as well.

All of that being said, I wanted to go ahead and put up some more pictures of our new apartment! These are just of the bedroom, and this is probably the room that changed the least when we moved from the studio. My favorite part of our whole apartment is my small vanity/desk that actually used to be our kitchen table. It's the one space that contains so many of my favorite things: my favorite framed quote, a picture of Tatum, and a tray of my favorite perfume and nail polish. I've also grown to love collecting vintage brooches, so I think the little display box that I found is so pretty!

One of the things that I was most excited about by having a larger bedroom: his and hers dressers! It's been so nice not to cram everything into one dresser... although I have taken over one full drawer of the "his" dresser. Vlady knows that sharing is caring, so thankfully he's nice enough to share his space with my stuff. :)

And on another note: these pictures are pretty terrible (they were taken with my iPhone). I think it's time for a real camera.


My favorite spot: my vanity!
"Hers" dresser

A few of my favorite things: picture of my niece, my vintage brooches, favorite perfume and nail polishes and the best smelling candle EVER.

Looking in from the door

Looking into the room from the window

"His" dresser

Favorite quote and cute owl

Another shot of the dressers

Thursday, September 20, 2012

One Fine Day

I know that I still owe a couple more apartment pictures, but those haven't been snapped yet (I know, I know..), and I wanted to talk about what we did last Sunday instead. Maybe it's not quite as exciting, but it was one of my favorite days in a long time!


We started the morning by having one of our good friends come over to do a fitness/posture/muscle alignment assessment on us to help us determine what corrections we may need to make while working out. It was very informative, and I was actually sore the next day from one of the moves we had to do (Judy: don't judge).

By about 2:00pm we had not eaten and were STARVING; so naturally we went and got chicken and waffles. Not exactly the most healthy meal, but when you're about to eat your own arm off sometimes that can be over looked a tad (or a lot). Although the service in the restaurant was sub-par (at one point the waitress walked away in the middle of taking my order!), the food itself hit the spot perfectly.

After our late lunch we headed up to the Museum of Natural History to wander around and check out the new exhibit on bioluminescence called "Creatures of Light". I had been looking forward to this exhibit since it opened at the beginning of the year, and although we learned a lot and enjoyed it quite a bit I was a little disappointed at how small the whole thing was. We checked out some of the other parts of the museum as well before heading for a stroll through Central Park.
A 40x actual size portrayal of a bioluminescent mushroom in the "Creatures of Light" exhibit.

An Angler fish display

Now, the main reason I even suggested we go to the museum and park that day was because the weather was absolutely gorgeous. Slightly cool, no humidity and lots of sunshine made for a perfect day to be outside. We sat by one of the lakes and watched the boats paddle by for a while, and then we walked in the direction of the Boathouse to grab a drink and watch the sun go down.
Watching boats in Central Park

After our rest stop and cocktails at the bar we decided we were hungry again (which I didn't think was possible after the late lunch we had), and I made a last minute reservation at a restaurant called Jo Jo on the Upper East Side. I had heard good things about it, and the reviews on Yelp were good.. plus it's a Jean-Georges spot so that was enticing as well.

Oh my word was it ever delicious! We split 4 appetizers and I had a dessert, and I think it just might be one of my favorite meals ever. To start we had the tuna roll which was rare tuna wrapped in crispy pastry with a wasabi sauce, edamame and ginger. We also had the cheese ravioli with very, very fresh crushed tomatoes and Parmesan and a crab meat salad with mango and cumin crisps. After that we were still hungry and decided to get the crispy salmon "sushi" roll with a soy spread.

Tuna roll at Jo Jo
All of the ingredients were minimal and simple, but everything was so fresh and delicious that I was in heaven the whole time. Especially once the dessert came along. I know that I've talked before about what I thought was the best dessert ever, but I believe that has been trumped. The dessert I had at Jo Jo was a passion fruit pavlova that had a passion fruit filling, was topped with passion fruit seeds, and sat on a bed of fresh whipped cream. I died. I also asked the hostess if this was a seasonal dessert or one they had all the time, and she (thankfully!) told me that it is Jean-Georges favorite dessert and they have it year round.

Jean-Georges has good taste, I see.

So that was our fun day, and I enjoyed getting to have so much fun and experience so many new things with Vlady! Looks like this weekend will be beautiful as well, perhaps I shall have another fine day again.

Tuesday, September 11, 2012

New Apartment: After - Living/Dining Room

I feel bad. I promised to post these pictures about 3 weeks ago.. Oops! Well I'm happy to finally share some "after" pictures of our place, and I'm going to start out with my favorite room in the house: the living room.

Our living room is a combined living and dining space, and after having lived in a 1 room studio for a year I was so excited to finally have enough room to entertain. Our last place had a 2 seater table and the couch, so we sometimes had to sit on the floor to eat when we had guests! Now we have the 4-seater table plus some ottomans to provide extra seating, as well as more than enough standing space.

 My favorite part about the "dining room" space: the artwork! We found the vendor in Union Square, and while we admired their work we never really found any that we loved enough to buy. That is until we went to their website and found this series with the wine glasses and bottle! It's hard to tell, but the color of the glasses and bottle are actually a bright citrine, and we loved that with the other citrine accents in the room.

 That's our "bar". The plan is to keep the wine fully stocked at all times! (Also, I'm beginning to realize that my iPhone doesn't take as good of pictures as I'd like. This one is slightly tilted also, which is human error..)


 Looking into the living/dining space from the entry way.

 You can tell where the cat's been on the couch! We love that print of the city from Ikea.

 We have two of these, flanking the TV. There was a long discussion about what to do with that space (leaning bookshelves, floating bookshelves..), but I love the end result!

 The other book shelf and ottoman.

View from the "dining room" looking into the living room.

Tuesday, August 28, 2012

Slutty Brownies

You read that title correctly: slutty brownies.

Now I know that I promised an "after" post of our apartment as my next entry, but I'm going to be honest about why that isn't happening today. Although our place was in tip-top shape for our housewarming party, and while this would have been a prime time to snap some photos, I was too busy getting ready and making slutty brownies to take any.

Seeing as how the party was on Saturday and it is now a Tuesday the only other excuse I have is: I've been sucked into the Hunger Games trilogy. No seriously, that's the second reason I haven't taken pictures of our decorated place yet... because I can't put down those books! I also had to watch the first movie.. so..

Anyways, back to slutty brownies. Although I still can't get over the name of the recipe, I did in fact make a batch for the housewarming party after a friend recommended them over plain ol' brownies. They're called "slutty" brownies because they're "super easy, and more than a little bit filthy".. he he. Or at least that's what this blog says, which is where I was directed to retrieve the recipe (also: if you're looking for photos of the brownies, check out that girls post.. because I didn't take any. Oops).

Although these brownies are not my typical recipe (re: they are not good for you in any way, shape or form), they were simply to die for! There was not a single piece left after Saturday night, and I'm secretly grateful for that because that means no temptations sitting on my kitchen counter!

This recipe literally takes 45 minutes (including baking time) to make, so the easiness factor was a huge draw for me. I might make it my new mission to make this recipe in a reduced fat version. Could it be possible? Perhaps if I make my own batters instead of using mixes..

Hmmm..

Slutty Brownies

Ingredients

  • 1 box of chocolate chip cookie mix (and the ingredients the mix calls for: ex, oil, eggs, water, etc)
  • 1 box of brownie mix  (and the ingredients the mix calls for: ex, oil, eggs, water, etc)
  • 16-20 Oreos (double stuffed, preferably)
That's it!

Directions

Preheat oven to 350 degrees. Coat a 9"x13" baking dish with cooking spray, or line the edges with parchment paper (I didn't have any parchment paper on hand, and a good coat of Pam worked just fine). Follow the directions on the cookie mix box, mix cookie dough batter. 

Spread cookie dough evenly on the bottom of the pan (hands work best for that one) until it covers the bottom. Top with as many Oreos as you can fit (I fit 20). 

Follow the directions on the brownie mix box and pour over the Oreos. Bake for 30-40 minutes until done (note: when inserting a toothpick to check if it's done, it might come out looking underdone..but the melted chocolate chips and Oreos will do that). 

Let cool until just barely warm, cut into even pieces and serve. Watch as they are devoured!


Thursday, August 23, 2012

New Apartment- Before

As I alluded to in this post, it's taken us quite a while to get settled in to our new place. We are finally (officially) set-up, and we're having some folks over this weekend to celebrate! Below are the "before" pictures of the space.. basically, this is what our apartment looks like completely empty. I will post the "after" pictures of how we've decorated this weekend.

This is the first apartment that I've lived in since college that has felt the most like "home". I put "home" in parenthesis because my mom likes to remind me that my real home is in fact down south, with my family. I have to agree with her, but to me this apartment feels way more comfortable and home-like than our studio ever did.

Maybe it's because it is a true 1-bedroom and I don't feel like I'm living in a hotel (as I sometimes did with our one room studio). Or maybe it's because we've really put in the time and effort to make this place exaclty how we want it. Either way, I'm very happy with our decision to move into this apartment, and I can't wait to show the finished product!


Bedroom, looking in from the door

Bedroom (and closet) looking down towards the living room


Living Room view from the front hallway

Living room view looking towards the bedroom

Bathroom

Kitchen, one side


Kitchen, the other side


Balcony